Collectibles are all over the place in Star Wars Jedi: Survivor and are positive to maintain completionists busy for a good whereas. Between Chests, Databanks, Priorite Shards, Jedha Scrolls, Seeds, Power Factors, Fractures, and hidden bosses, there’s a lot to do. The easiest way to finish every little thing is by clearing every named location methodically, so listed below are all the collectible areas for Jedi: Survivor on the Loading Gantry outdoors of the Lucrehulk ship on Koboh.
All Loading Gantry Collectible Places in Jedi: Survivor
We’ve labeled all the areas on the Loading Gantry map under and have descriptions for every collectible location so as to add context. A few of these are harder to seek out although, so that you’ll discover supplementary screenshots for higher readability.
All Priorite Shards
The primary Priorite Shard is on the bottom degree by on the massive platform out by the lavatory. You’ll want to leap throughout a sinking block to succeed in the platform. Climb atop the massive cargo containers to seek out the Priorite Shard.
The second Priorite Shard is close by on the bottom degree. Again on the Lucrehulk ship there’s a touchdown above one of many wrecked AATs with an elevator entry level. Go to that touchdown and punctiliously cross across the storage tanks on the left-hand aspect to a hidden nook to seek out the Priorite Shard.
The third Priorite Shard is up within the Lucrehulk above. If you have already got entry to the carry, use that to get to an open hanger space the place the chest is close by. If not, you’ll must work by means of the extent till you get to a big room that appears like a hanger ripped in half. It’s known as the Hanger Rafters in-game. Search for a ramp that goes down one degree in the principle hanger. The Priorite Shard is below the ramp.
The final Priorite Shard is inside the Lucrehulk on higher upkeep decks. Recall the Magnaguard combat within the last room previous the 2 Bedlam Raiders. The Priorite Shard is on a small platform on the underside degree within the room the place the Bedlam Raiders spawn. Defeat the Bedlam Raiders then look out in direction of the bigger room and also you’ll see the twinkle of the Priorite Shard. You can too simply seize this after the final chest talked about later on this information.

Picture by PC Invasion
All Databank Entries
You will discover all three Databank Entries on the following areas for the Loading Gantry in Jedi: Survivor. The primary is on the bottom degree at one of many beige AAT tanks. It’s close to the middle of the realm and tough to overlook.
The subsequent Databank Entry can also be accessible from the bottom flooring. There’s a touchdown instantly above the identical tank which you’ll be able to entry through ramp. Method the storage tanks on the left aspect and also you’ll see the Databank Entry.
You’ll discover the final Databank Entry on a platform out in direction of the route of the lavatory. Simply observe the identical path up from the bottom flooring that you just take in the course of the first playthrough (no shortcuts). You’ll see it on a bit of wreckage that you should soar to.
All Chests
The chest areas are extra unfold out throughout the Loading Gantry than the Databank Entries. The primary is on the bottom flooring previous the tanks on the massive platform on the fringe of the lavatory. You’ll want to leap onto a sinking block and once more to the platform. Take a left round some storage crates and also you’ll see the chest on the finish out within the open. It comprises the Quick Goatee hair model for Cal.
Picture by PC Invasion
The subsequent chest is up within the Lucrehulk ship. If you have already got entry to the carry, use that to get to an open hanger space the place the chest is close by. If not, you’ll must work by means of the extent till you get to a big room that appears like a hanger ripped in half. It’s known as the Hanger Rafters in-game. There’s a small room above carry in that room which comprises the chest. You’ll want BD-1’s Electro Dart potential to activate a close-by energy coupler to open a grappler that will get you to that room. That is the place to seek out the colour patterns for the favored Commander outfit pants.
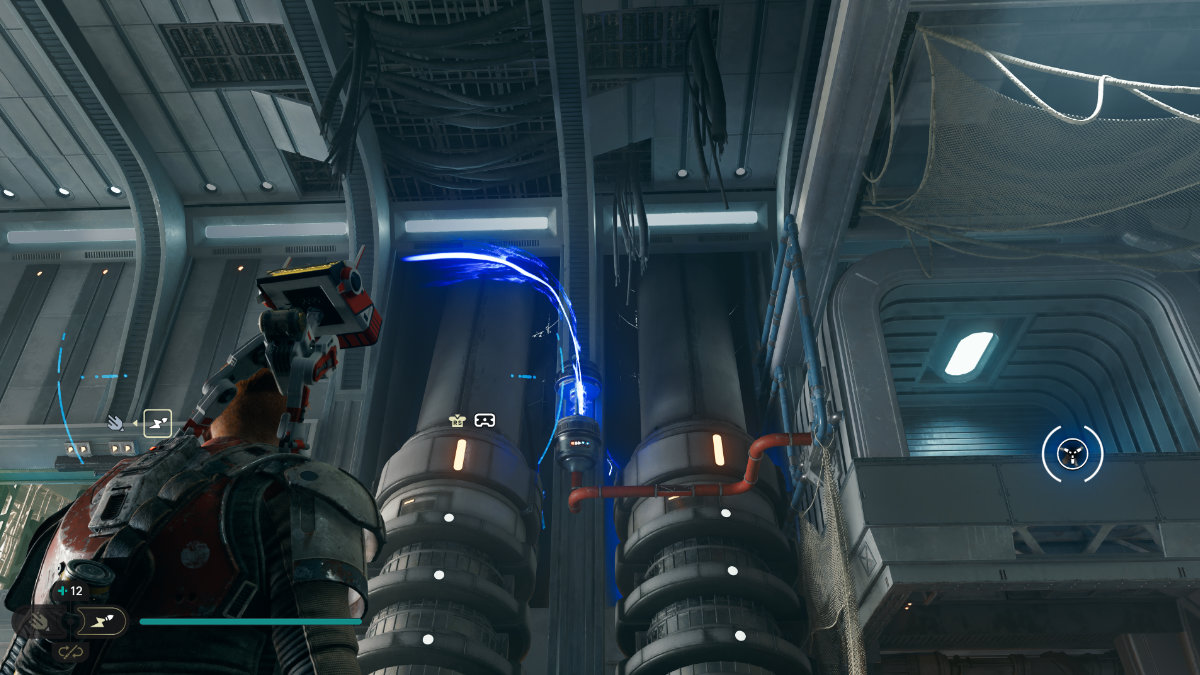
One degree above is a hallway that’s not at all OSHA compliant with {the electrical} currents freely arcing all over the place. The chest is on the far finish when going through in direction of the inside of the ship. You may wall run to the platform on the opposite aspect of the electrical energy after which drop down and air sprint into the room the place the chest is. This chest comprises the Enforcer blaster barrel.
Picture by PC Invasion
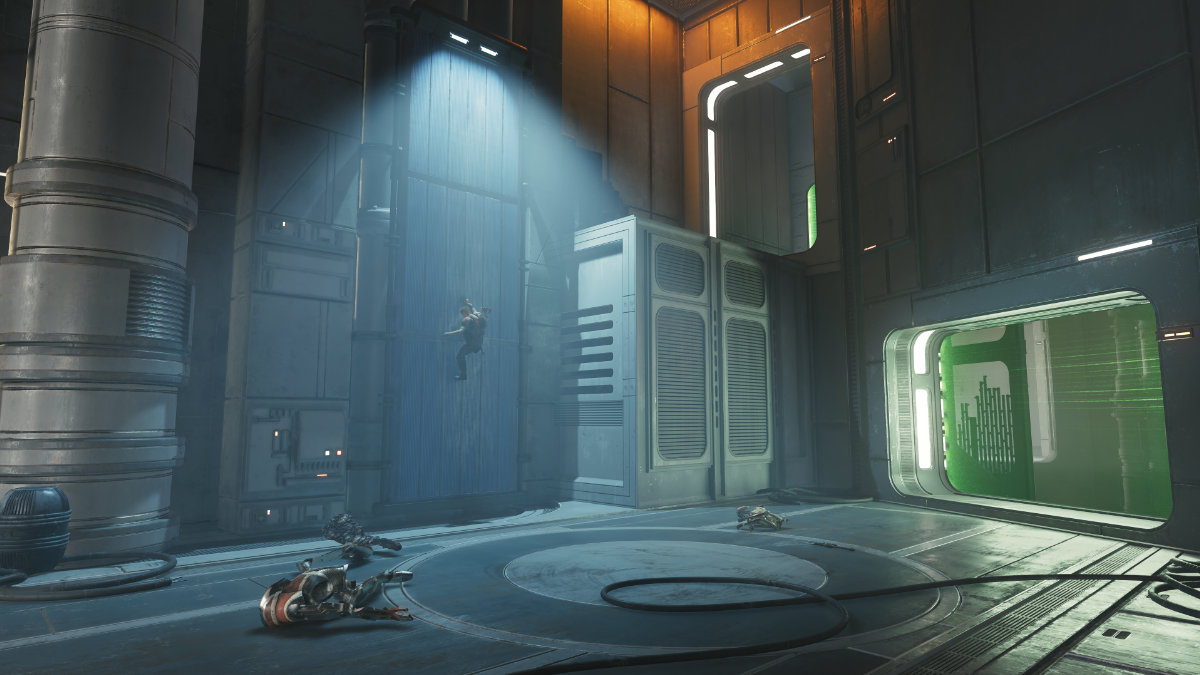
The final two chests are inside the Lucrehulk on higher upkeep decks. Recall the Magnaguard combat within the last room previous the 2 Bedlam Raiders. The room the place the Bedlam Raiders spawn has a big vertical upkeep and cargo space above and you’ll climb up the partitions to the upkeep deck.
From there, you should soar sprint by means of the ray defend and wall-run to the recess which you’ll be able to mantle forwards and backwards as much as the subsequent degree. The fourth chest is on the high on that upkeep platform.

Picture by PC Invasion
Proceed to the left from that chest to the subsequent platforming part. You ought to be conversant in these mechanics by now. You’ll must wall-run then soar to a vertical wall and soar up a number of ft earlier than transferring left to a different wall-run and transferring once more to succeed in the far platform. Don’t overlook to destroy the droids in stand-by mode earlier than opening the chest. There’s additionally a wall you’ll be able to slide down from that platform to go away this part.
That’s all the collectible areas all through the Loading Gantry in Jedi: Survivor. We even have a information on the place to seek out all the Priorite Shards at Rambler’s Attain so you should buy extra customization types and the place to seek out all 18 Bounty Puck areas associated to bounty hunters.
