A lot of the work in a Darkest Dungeon 2 run is accomplished earlier than the run has even formally begun. The get together creation stage, the place you select which 4 heroes you’ll be taking with you, is extremely necessary, outweighing a lot of the particular person choices you’ll make out on the highway or in battle. It’s necessary to select one of the best heroes for the job, in fact, nevertheless it’s equally necessary to rearrange them into a celebration that is sensible, and has the interior synergy obligatory to hold you thru to the Mountain. If you’d like some options on squads that may do exactly that, then learn on for our information to one of the best staff comps in Darkest Dungeon 2.
The most effective staff comps in Darkest Dungeon 2
The ol’ dependable
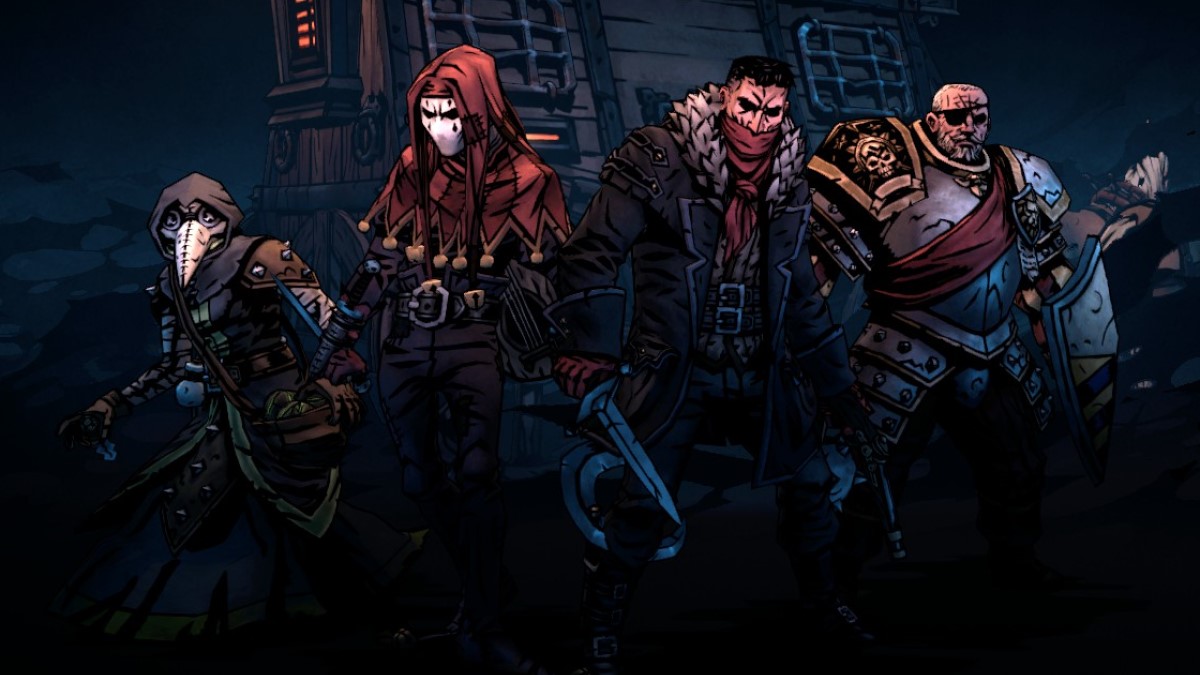
Picture by PC Invasion
That is the staff comp you’ll see most frequently in Darkest Dungeon 2, and for good purpose: it offers one of the best, most balanced set of skills potential, and may get you thru runs very constantly. The truth that it’s virtually completely composed of characters unlocked by default reveals that Pink Hook Studios does have a coronary heart, someplace in there.
| Plague Physician | Jester | Highwayman | Man-at-Arms |
| Path:
Alchemist |
Path:
Virtuoso |
Path:
Sharpshot |
Path:
Vanguard |
Abilities:
|
Abilities:
|
Abilities:
|
Abilities:
|
We’ll begin with the Man-at-Arms. On this comp he does what he does finest: lead the get together from the entrance and assist his teammates as they carry you to victory. Vanguard is our path of alternative right here, offering a strong well being and harm enhance whereas the Man-at-Arms is in your entrance rank. Defender is his major ability, letting you defend certainly one of your different heroes from a few assaults. That is nice when somebody is low on well being, or once they’re gearing up for a giant assault and also you don’t need them getting disrupted by standing results. On high of this we use Bolster for Stress therapeutic with incidental Block acquire, Maintain the Line to get well from rank disruption strikes like Categorize, and Bellow to decelerate enemies and stop them from touchdown devastating vital hits. We high issues off with Crush, a strong attacking transfer, particularly on the Vanguard path, and one that may present essential therapeutic in a pinch.
Subsequent up is the Highwayman, the get together’s important harm supplier. On the Sharpshot path, all of his ranged assaults get a large harm enhance, and we’ve chosen to lean onerous into that right here by together with all three of them: Pistol Shot, Grapeshot Blast, and Double Faucet. All three have their makes use of in several eventualities, however earlier than you utilize any of them it’s best to open every fight with Take Purpose, which ensures two vital hits as soon as upgraded. Take Purpose adopted by Grapeshot Blast is a dependable opening sequence, dealing massive harm to the entrance ranks whereas sustaining a Power and Crit token on your subsequent flip as effectively. Double Faucet is probably the most damaging of your assaults right here, particularly on foes beneath 50% well being, so when you’ve gotten the prospect to make use of it, accomplish that. Pistol Shot is not any slouch both, nevertheless, and may attain the again ranks, making it an important alternative in opposition to utility enemies who disguise within the again and supply assist to their allies. Lastly, we end off with Freeway Theft, a ability that may take away, and as soon as upgraded, steal, optimistic tokens from enemies. That is notably helpful in Cultist battles and boss fights, and may prevent from a number of harm if timed appropriately.
The Jester is up subsequent, and he fills just a few totally different niches on this get together. He can apply Combo tokens with Razor’s Wit, Blind with Fade to Black, Bleed with Harvest, and deal massive harm himself with Finale. Harvest is a superb opener in opposition to enemies with Block or Dodge, because it hits two ranks directly and may eat by means of these pesky tokens with a purpose to clear the best way for the Highwayman to deal full harm. Razor’s Wit can arrange a double-damage Finale from the Jester himself or a heal on the Man-at-Arms through Crush, and it will probably additionally get the Jester in place for the previous as effectively, since by default he’s unable to make use of it. Lastly, we’ve Encore. This grants an additional flip to a different get together member, and it has an enormous array of potential makes use of on this comp. One strong line is to begin the Highwayman off with Take Purpose, then have the Jester use Encore on him, permitting for a direct vital hit. It will possibly additionally enable for essential heals, of HP or Stress, by concentrating on the Plague Physician or Man-at-Arms, respectively.
Final however not least, we’ve the Plague Physician, who serves as a healer and assist unit for the get together on this comp. We embody each of her therapeutic expertise, Battlefield Medication and Indiscriminate Science, as each are nice in several eventualities; the previous when coping with standing results, and the latter when coping with debuffs. Whereas Battlefield Medication barely advantages from being mastered, Indiscriminate Science most actually does, so get that achieved as quickly as potential. We additionally use Emboldening Vapours, which lets us apply the Power standing to both the Highwayman or the Jester for an enormous hit subsequent flip. Lastly, we spherical issues off with two Blight-inflicting expertise: Noxious Blast and Plague Grenade. Each are perfect on massive targets, and may soften them up properly on your harm sellers to complete off later, however Plague Grenade specifically is extraordinarily helpful, as it will probably hit each of your back-rank foes directly, eradicating Block and Dodge and inflicting Blight unexpectedly. Significantly in Cultist battles, this can be a useful ability to carry.
The combo meal
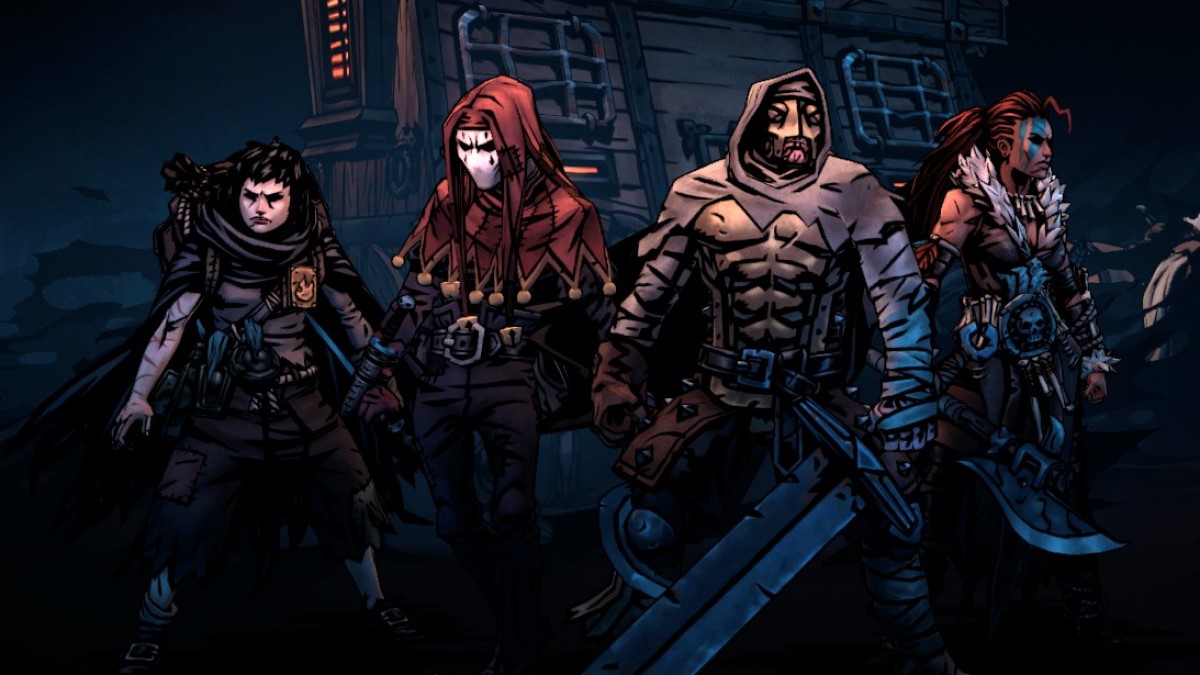
Picture by PC Invasion
Whereas our first construct emphasised steadiness and synergy, our second is extra of an all-in technique, going for probably the most harm potential within the fewest variety of turns. Hellion, Leper, and Jester are all able to massive harm, and all make nice use of Combo tokens, which the Runaway and Jester can arrange reliably every flip.
| Runaway | Jester | Leper | Hellion |
| Path:
Orphan |
Path:
Virtuoso |
Path:
Tempest |
Path:
Ravager |
Abilities:
|
Abilities:
|
Abilities:
|
Abilities:
|
The Hellion is our frontline fighter on this comp. The Ravager path provides her 20% additional well being and 25% additional harm so long as she stays in that rank, two important bonuses that concurrently let her last more and be certain that your enemies received’t. Additionally they play properly along with her innate passive capacity, which grants 25% additional harm whereas she’s beneath 50% well being, and a further 25% harm when she’s beneath 25% well being. On this comp, we’re funneling all of that juicy additional harm into Hellion’s attacking strikes: Depraved Hack, Iron Swan, and Howling Finish. Hack is probably the most primary, and will probably be your go-to in most eventualities. It offers strong harm, and offers much more if the goal has a Combo token. Iron Swan is extra specialised, hitting the again rank completely, and is helpful in battles with annoying assist items that like to hang around there. It additionally applies a Combo token when mastered, which performs very properly on this comp. Howling Finish is immensely highly effective, nevertheless it applies Winded and pushes Hellion again into rank 2: two issues you can very a lot do with out. For that purpose, it ought to primarily be used as an emergency kill button and never as a strong opener, tempting as that could be. Past harm, we’ve a few assist strikes: Adrenaline Rush, which gives therapeutic and a method of eradicating the Winded tokens inflicted by Howling Finish, and Raucous Revelry, one other heal that may additionally present important party-wide Stress therapeutic.
The Leper is subsequent in our lineup of heavy hitters, and whereas he can’t do as a lot harm because the Hellion more often than not, he can take much more, which supplies him a powerful defensive area of interest throughout the get together. His core attacking transfer is Chop, which offers massive harm to enemies in rank one or two, however usually leaves the Leper Blind afterwards. This may be a difficulty, however we’ve a number of methods of working round it. Firstly, Combo tokens. Chop at all times hits, no matter Blind, if the goal enemy has a Combo token. Given how simply you may apply these on this comp, you’ll be counting on this side of the ability loads. Secondly, you may take away Blind utilizing Reflection, a ability which additionally offers incidental Stress therapeutic and removes the uncommon Combo tokens enemies place on the Leper. This ability will get loads higher when mastered, because it heals extra Stress and can be utilized and not using a cooldown, so throw a degree into it when you may. The Leper’s different attacking transfer right here is Bash. It doesn’t deal a lot harm, nevertheless it locks the goal in place, which may be helpful, and it additionally applies a Combo token when mastered, tying in properly with our comp. We high this strong base off with Solemnity, which is an unbelievable therapeutic possibility for each well being and Stress, and Stand up to, which lets the Leper tank up and take hits for the remainder of the get together for some time. That is notably helpful when the Hellion is operating low resulting from frontline publicity, or when she’s been pushed again resulting from Howling Finish.
The Jester performs a lot the identical as he did within the ol’ dependable comp above on this one: he applies Combo tokens with Razor’s Wit, doubles up on highly effective expertise with Encore, and infrequently lands a killer blow himself with Finale. The latter situation is more likely right here, nevertheless, given our quick access to Combo tokens, that means the Jester will get to share extra of the highlight this time round. He nonetheless does loads of supporting although, utilizing Fade to Black to close down highly effective enemy attackers, and Battle Ballad to use Power to both the Hellion or Leper: whoever’s subsequent within the flip order. Battle Ballad additionally pushes the goal ahead one rank, which makes it an effective way of reorganizing the get together post-Howling Finish.
Lastly, we’ve the Runaway. She’s at her finest in a assist function, and that’s what she performs right here, organising enemies to take large harm from the Leper and Hellion, and providing situational therapeutic in a pinch. Smokescreen is her finest ability, and among the best setup expertise within the recreation, making use of a Combo token, Blind, and, as soon as mastered, Susceptible, to a single foe. This all however ensures that the subsequent Depraved Hack, Chop, or Finale that hits the enemy in query will end it off, except it’s a boss such because the Dreaming Basic in fact, whereas additionally decreasing the specter of the enemy through Blind. Hearthlight removes Stealth from all enemies, which is area of interest at finest, nevertheless it additionally removes Blind from your entire get together when mastered, which is the explanation for its inclusion right here. This works notably effectively for the Leper, in fact, however Blind can be pretty widespread all through the sport, so it’s good to have an accessible remedy on-hand whenever you want it. Cauterize is an admittedly-situational therapeutic ability, nevertheless it’s nice when it really works, and Bleed is widespread sufficient for it to be viable. Along with these assist strikes, we’re additionally operating two Burn-inflicting expertise right here: Firefly and Firestarter. The Orphan path boosts the Burn inflicted by every, whereas additionally letting Firestarter grant you a Crit token on use. Each may be helpful in drawn-out boss battles, and in between cooldowns on different expertise, however usually Runaway ought to concentrate on supporting your different three get together members on this construct.
The sunshine and darkness
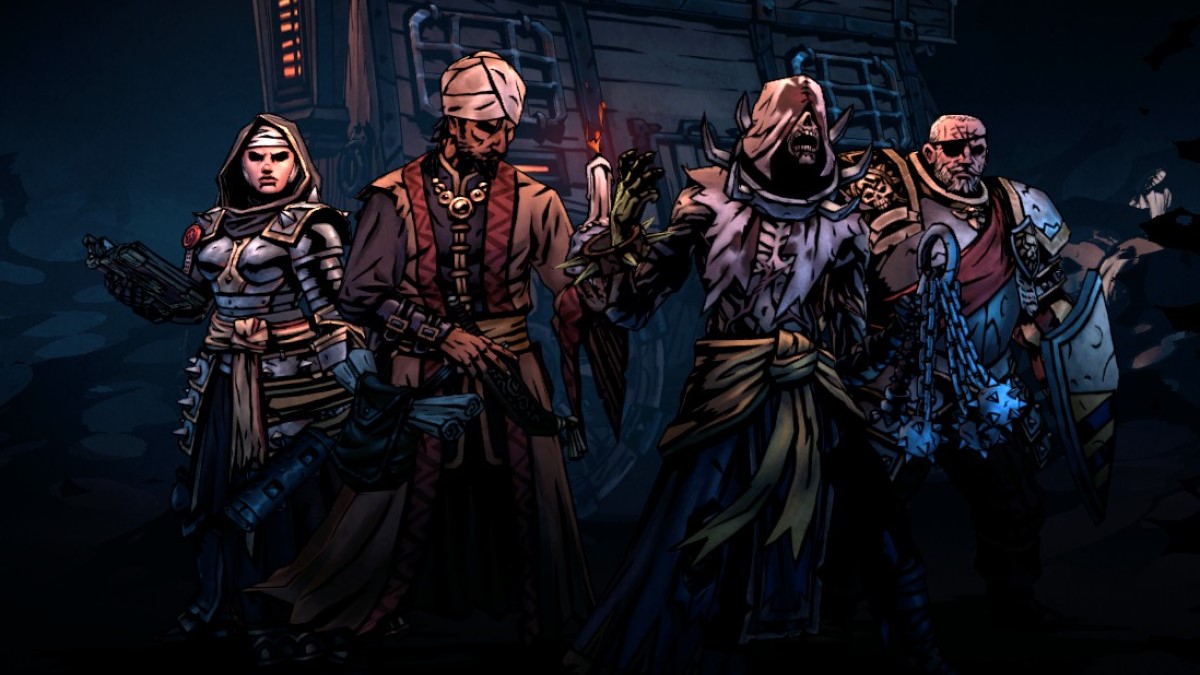
Picture by PC Invasion
A pleasant thematic construct in addition to a mechanically highly effective one, the sunshine and darkness comp sandwiches two of the sport’s most evil characters between two of its most virtuous. The Man-at-Arms and Vestal present two-sided assist to main harm sellers within the Occultist and Flagellant right here, forming a construct that may hit onerous and get hit onerous in equal measure.
| Vestal | Occultist | Flagellant | Man-at-Arms |
| Path:
Seraph |
Path:
Warlock |
Path:
Wanderer |
Path:
Vanguard |
Abilities:
|
Abilities:
|
Abilities:
|
Abilities:
|
Man-at-Arms does what he does finest on this comp: protects your different get together members from hazard. He does this through Defender and Retribution primarily, the previous of which accurately guards one other member from a few assaults, and the latter of which pulls the subsequent two enemy assaults to him earlier than dispensing harm in return. Retribution will get a pleasant enhance since we’re on the Vanguard path, nevertheless it’s the Taunt side we’re most desirous about, because it permits us to maintain the warmth off of the Flagellant and Occultist. Bolster and Maintain the Line allow you to cope with Stress and get together lineup disruption with ease, whereas Crush offers a strong attacking transfer to make use of in a pinch, additionally backed by a lift from the Vanguard path. General, the Man-at-Arms helps you retain your get together alive, which is totally very important.
The Flagellant is among the extra advanced characters within the recreation, and the function he performs right here is advanced as effectively. He concurrently offers strong harm, Blight, and assist in a single twisted package deal, making him really feel a bit like a ‘darkish world’ model of the Man-at-Arms. Punish is a strong attacking transfer that inflicts Blight as effectively, making it your go-to on most turns. Acid Rain capabilities very equally to Plague Physician’s Plague Grenade, letting you disrupt the enemies within the again ranks, take away their Block and Dodge, and apply some Blight to melt them up. Lash’s Reward is a self-heal and a buff multi functional, finest used after a pair rounds of Punish and Acid Rain, and finest utilized to the Occultist, since he could make finest use of the Power and Block tokens. Extra! MORE! Is just like Retribution, drawing fireplace to the Flagellant whereas offering him a profit in return, on this case self-healing. This can be utilized when your different heroes are operating low, or when the Flagellant himself is, and it’ll work nice in each eventualities. Lastly, we’ve Sepsis: in all probability the Flagellant’s strongest transfer, offering harm, self-healing, and Blight multi functional. Once you fall low sufficient to make use of this, you virtually at all times ought to, since it will probably flip the tides of a battle in a single flip.
The Occultist is our major harm supplier on this comp, relying primarily on his devastating Burning Stars ability to demolish your foes in a single hit. His immense energy comes with two important tradeoffs: his personal frailty and lack of well being, and his reliance on Unchecked Energy tokens, which put extra strain on his already-limited life by often making use of the Burn standing to him. Due to this, a number of this comp is devoted to defending the Occultist from hurt in order that he could make one of the best use of his excessive energy degree. The Burning Stars requires two Unchecked Energy tokens to make use of, so we’ve included Chaotic Providing right here as a straightforward technique of producing them. Mixed with the Warlock path, it’s potential to generate two Unchecked Energy tokens a flip with Providing, which is able to assist you to use The Burning Stars each flip, because it doesn’t have a conventional cooldown. For turns when the Stars don’t fairly align, we’ve our different expertise. Weakening Curse is a perfect setup transfer, making use of Weak alongside a Combo token, whereas Abyssal Artillery and Daemon’s Pull are various ranged assaults that profit from the Warlock path whereas providing you with extra choices. Pull specifically is nice, as it will probably carry pesky utility enemies to the entrance, inside vary of the Man-at-Arms and Flagellant.
And to high off our morality sandwich, we’ve the Vestal. She performs a assist function right here, utilizing the Seraph path to maximise the ability of her Consecration expertise, then utilizing stated expertise as a lot as potential to spur the opposite staff members on to victory. Consecration of Mild boosts harm, and may subsequently be utilized to the Occultist firstly of each battle, because the 5 turns it lasts ought to be sufficient to spice up two to 3 makes use of of Burning Stars. Consecration of Fortitude can be utilized on both the Man-at-Arms or the Flagellant, whoever wants it extra on the time. It raises defenses, and is right for supporting the tanky playstyle we use on the frontlines. We additionally run Mantra, which is a strong therapeutic ability with a large utilization window, due to the prolonged lengths of our Consecrations. These three expertise will probably be what Vestal is utilizing more often than not, however her different two slots enable for some extras. Illumination removes each Stealth and Dodge, which may be helpful to make sure you don’t miss with The Burning Stars, and Judgement is a strong ranged assault that may hit any rank, and deal respectable harm after you amass two Conviction tokens through the use of your Consecrations. With the Vestal, it’s best to cycle between organising Consecrations, eradicating Block and Dodge with Judgement and Illumination, and therapeutic with Mantra when obligatory.
The rogues’ gallery
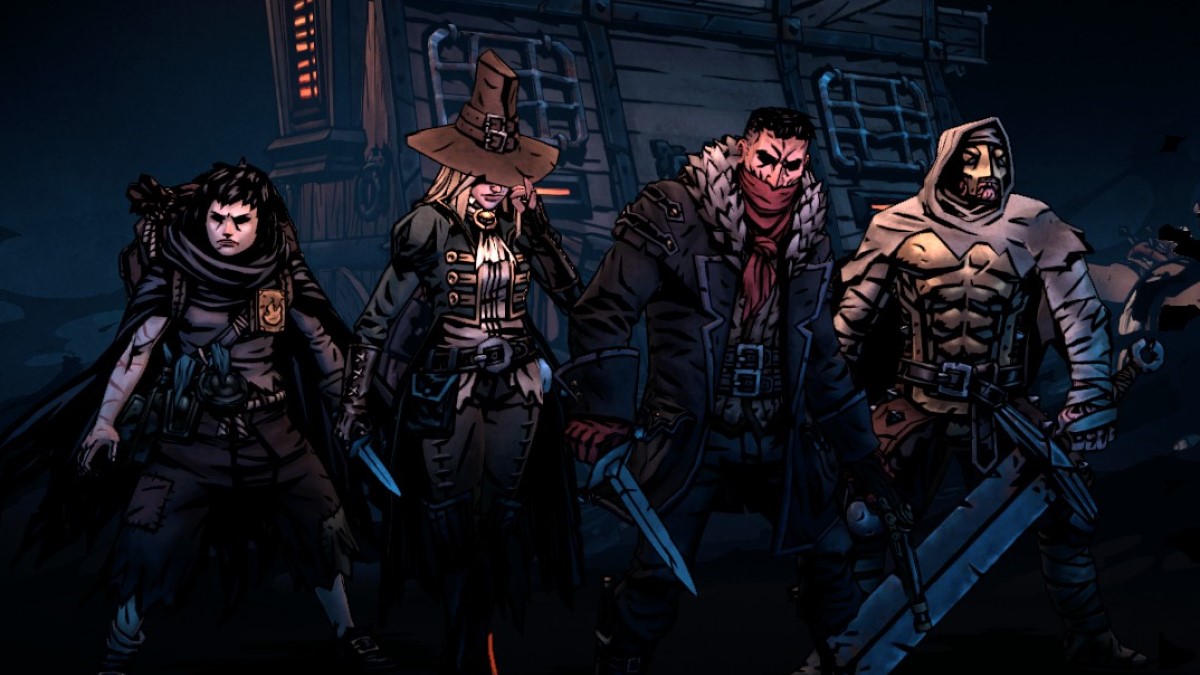
Picture by PC Invasion
Our ultimate staff comp is certainly one of our most advanced: a set of the darkest-hearted heroes within the recreation, organized into a celebration that makes in depth use of motion expertise and off-kilter techniques to win the day. Should you’re on the lookout for a extra dynamic and attention-grabbing option to play Darkest Dungeon 2, then that is the get together for you.
| Runaway | Grave Robber | Leper | Highwayman |
| Path:
Arsonist |
Path:
Nightsworn |
Path:
Poet |
Path:
Rogue |
Abilities:
|
Abilities:
|
Abilities:
|
Abilities:
|
We start with high-damage favourite the Highwayman, albeit on the Rogue path this time somewhat than his normal Sharpshot. As a Rogue, the Highwayman will get a big harm enhance whereas in rank one, in addition to a free Riposte token after every use of Level Clean shot, a strong ability that may solely be used from rank one. Because of this, we begin him out in rank one, however he’ll be leaping backwards and forwards between one and two for many of every battle. This is because of Level Clean Shot, which sends him again a rank, and Duelist’s Advance, which brings him ahead one. Neither of those expertise have cooldowns, so you may swap ranks at will. Whereas up entrance, you’ll usually simply be utilizing Level Clean Shot and fading again once more, whereas in rank two you’ve gotten extra choices. You should use Pistol Shot to succeed in extra of your enemies, or arrange for elevated harm with Monitoring Shot and Take Purpose. He’s efficient in each ranks, however his place additionally determines which expertise can be found to our subsequent hero in line, the Leper.
By selecting the Poet path, we relegate the Leper to extra of a assist function than a damage-dealing one on this construct. With much less harm however extra self-healing, he can afford to spend extra time taking hits for the get together somewhat than dealing them out himself. We nonetheless carry Chop, in fact, because it’s fairly highly effective even with the harm discount, and it’s good to make use of on the off turns in between self-healing and assist strikes. Stand up to is important, and may often be your opener, because it lets the Leper tank by means of a number of hits for the get together. Solemnity and Reflection are your self-care expertise, nice for protecting well being excessive and Stress low in an intense battle the place the Leper is taking a lot of the warmth. Intimidate is an unbelievable assist transfer, performing as one other supply of Taunt alongside Stand up to, whereas concurrently weakening any goal’s subsequent two assaults. It additionally, bizarrely, lacks any form of cooldown or use restrict, that means you may spam it with impunity when you’ve exhausted your provide of Stand up to to maintain the taunt practice chugging alongside properly. It does require the Leper to be in rank one, nevertheless, so that you’ll must time it proper, and use it when the Highwayman has slipped again to rank two.
Subsequent up is the Grave Robber, the get together’s resident Stealth professional. Whereas selecting the Nightsworn path reduces her well being by 20%, it offers an enormous 50% harm enhance whereas in Stealth, making the target of this construct clear: purchase Stealth, and assault from it as usually as potential. To realize this, we’ve two expertise: Useless of Evening and Shadow Fade. The previous requires an enemy corpse to make use of, nevertheless it offers therapeutic and corpse clearing alongside two Stealth tokens. The latter is extra accessible, however offers no extra advantages, outdoors of sending the Grave Robber again two ranks. When you’re in Stealth, the same old line is to make use of Lunge, adopted by Pirouette on the subsequent flip. Each of those are high-damage expertise with excessive Crit charges, which mix very properly with the 50% harm enhance that Stealth affords the Grave Robber right here. They assist you to focus down the enemies within the entrance ranks, earlier than retreating to the again to attend out your cooldowns. Additionally they each transfer you round, Lunge ahead by two, Pirouette again by three, that means they will unlock some position-dependent expertise for our final get together member, the Runaway. Whereas these are the Grave Robber’s core strikes, we additionally run Poison Dart for a dependable assault possibility that can be utilized with out altering rank, for turns when doing so would mess up bigger plans.
Lastly, the Runaway rounds issues off, adopting a Burn-focused moveset alongside the Arsonist path, for apparent causes. She retains Smokescreen and Hearthlight from her moveset in our combo meal comp, to assist the damage-dealing efforts of the Leper and Highwayman, however this time she leans more durable right into a Burn theme with Managed Burn. This is a wonderful ability that units a everlasting fireplace in an enemy rank, inflicting Burns over time. She will solely use it from rank three onwards, that means you’ll must shift her place through the Grave Robber, however that is simply achieved with both Shadow Fade or Pirouette. Past this she makes use of Firefly and Firestarter for full Burn protection, letting her carry down her vengeful flames on any enemy, wherever it’s. The Runaway ought to alternate between setting fires and organising harm, utilizing Smokescreen every time potential, and softening up enemies with Burn on the off turns.
So there you’ve gotten it: one of the best staff comps in Darkest Dungeon 2. These 4 get together setups every have a number of inner synergy, a coherent gameplan, and, most significantly, the capability to get you to the tip of a run. Some are trickier to grasp than others, and a few will probably be extra attention-grabbing to play over a number of runs than others, however all 4 will serve you effectively in your quest to succeed in the Mountain.

