Ritual Ashes of the Sker Lodge is a difficult map stuffed with twisting passages and cryptic puzzles. If you happen to’re struggling, let me show you how to with our Sker Ritual Ashes of Sker Lodge information: Full walkthrough and all aims.
Easy methods to full each goal in Sker Ritual: Ashes of Sker Lodge
Sker Lodge is brutal to navigate, so anticipate the story to take a number of goes till you’ve familiarized your self with the map format. I discovered the lighting on this stage significantly obnoxious, to the purpose the place I modified my graphics settings. I turned my Gamma up and likewise turned Volumetric Fog off. You’ll find this proper on the backside of the graphics menu.
There are a number of aims to finish within the Sker Lodge, so let me clarify each step-by-step.
Refuel the Teleportation Platform
Your first mission is to revive energy to the Teleporter in the midst of the Grand Corridor. You’ll be coming again right here typically, because it’s like a central hub for the map. Seize the Canister by the Teleporter and open the door to your left.

Head downstairs, and also you’ll see a room stuffed with purple fumes. There are 4 targets on the partitions to shoot in right here, however the fumes will kill you when you keep too lengthy. Fortuitously, you’ll be able to hit three of them from the doorway. There’s a goal tucked in the proper nook of the room, and you’ll briefly enter and shoot it earlier than taking deadly harm.
The fumes will dissipate once you hit each goal, permitting you to get inside. Work together with the receptacle to the left to position the canister. This room is the Basement Furnace, and I like to recommend memorizing the placement, as the Tremendous Charger machine is right here. When you’ve positioned the canister, stand in a circle close to the receptacle whereas the progress bar on the left fills up. Lastly, seize the canister, work together with the marked receptacle within the Grand Corridor, after which work together with the Teleporter.
Failure to Launch
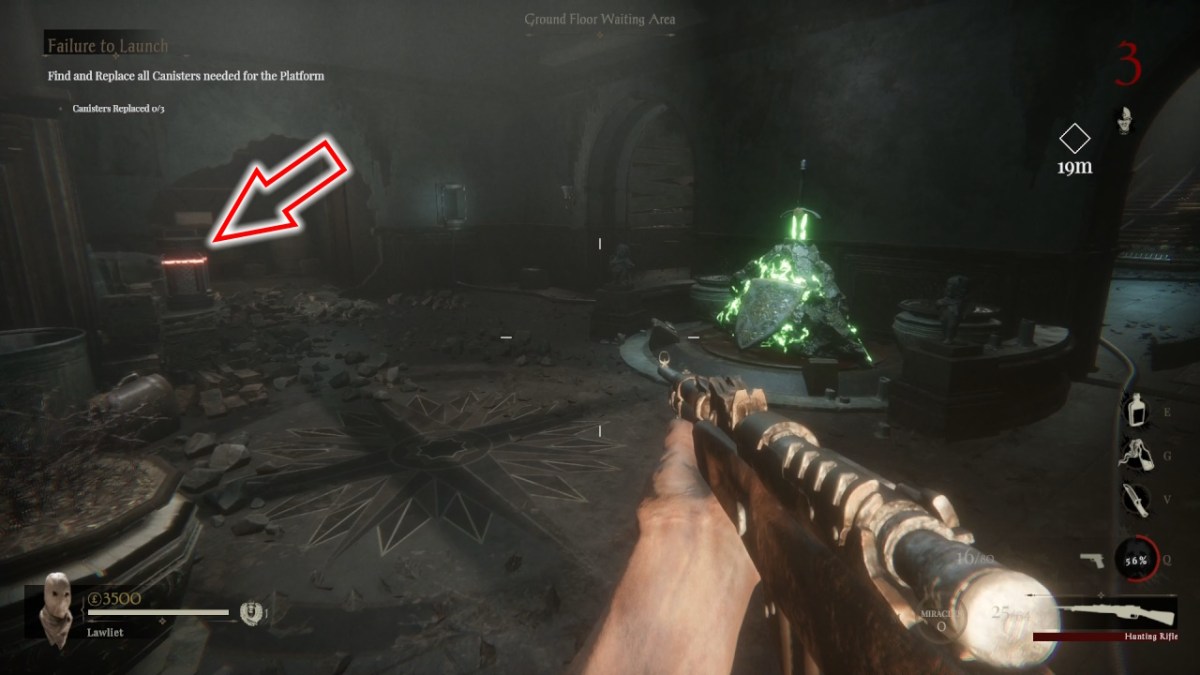
Your subsequent mission is to do the identical factor once more for 3 different receptacles close to the Grand Corridor. The difficulty is discovering the canisters within the first place, as they’ve random spawns. I discovered one within the hall behind the staircase within the Grand Corridor.
I discovered one other within the room simply behind the Grand Corridor close to the inexperienced sword (pictured above).
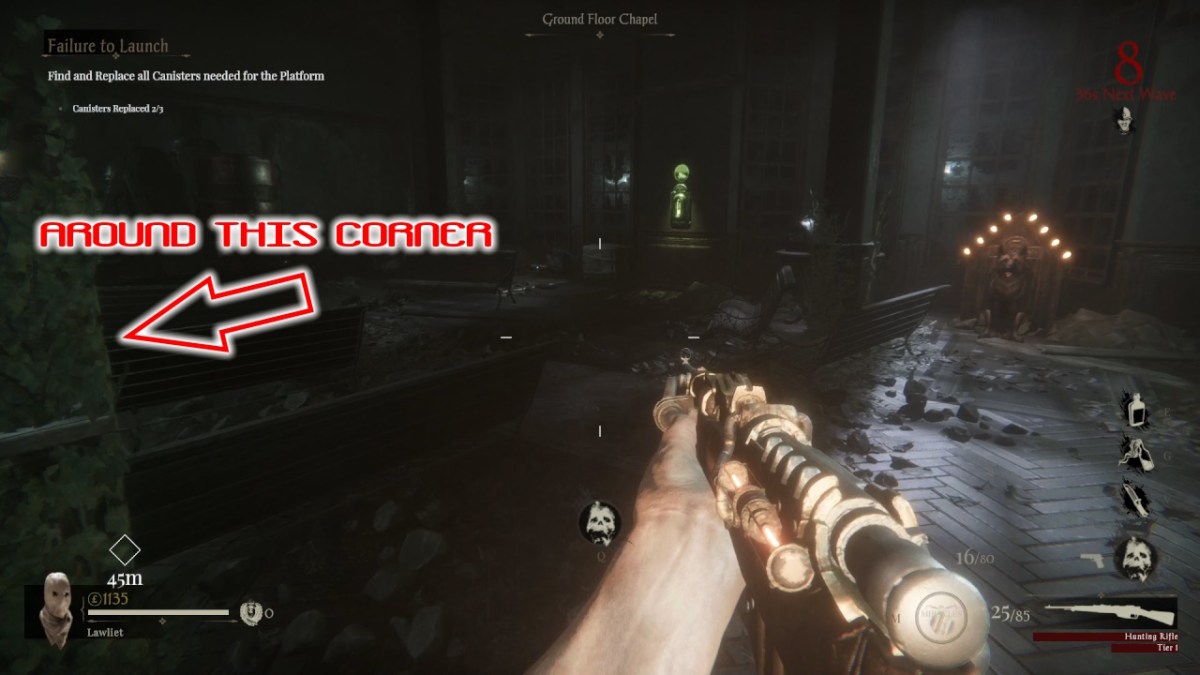
The ultimate canister took me some time to search out, as I needed to open two extra doorways on the bottom stage to achieve it. It was within the Floor-Flooring Chapel, which is thru the door useless reverse the primary one you opened to entry the Basement Furnace.
Unusual Locations
With each canister in place, you’re lastly prepared to make use of the Teleporter for the primary time. You’ll arrive in a room with a chest straight in entrance of you once you teleport. Open the chest, and 5 Killerwatts (electrical zombies) will spawn. Defeat them and the Howler will seem within the chest you opened. Oddly sufficient, the Howler prices £2000, nevertheless it’s a vital buy and is required for the hunt.

The Howler is a implausible weapon and offers a ton of injury. It’s so good that I put it via the Tremendous Charger twice throughout my run and used it as my major weapon. It hits onerous and is fairly ammo-efficient as nicely.
Easy methods to use the Howler within the Darkish to Enter the Cryptic Code
This is among the most complicated steps within the story for this stage. You’ll want to move downstairs for this one, so go down the staircase towards the Basement Furnace and switch proper as a substitute of left to entry the remainder of the underground rooms.
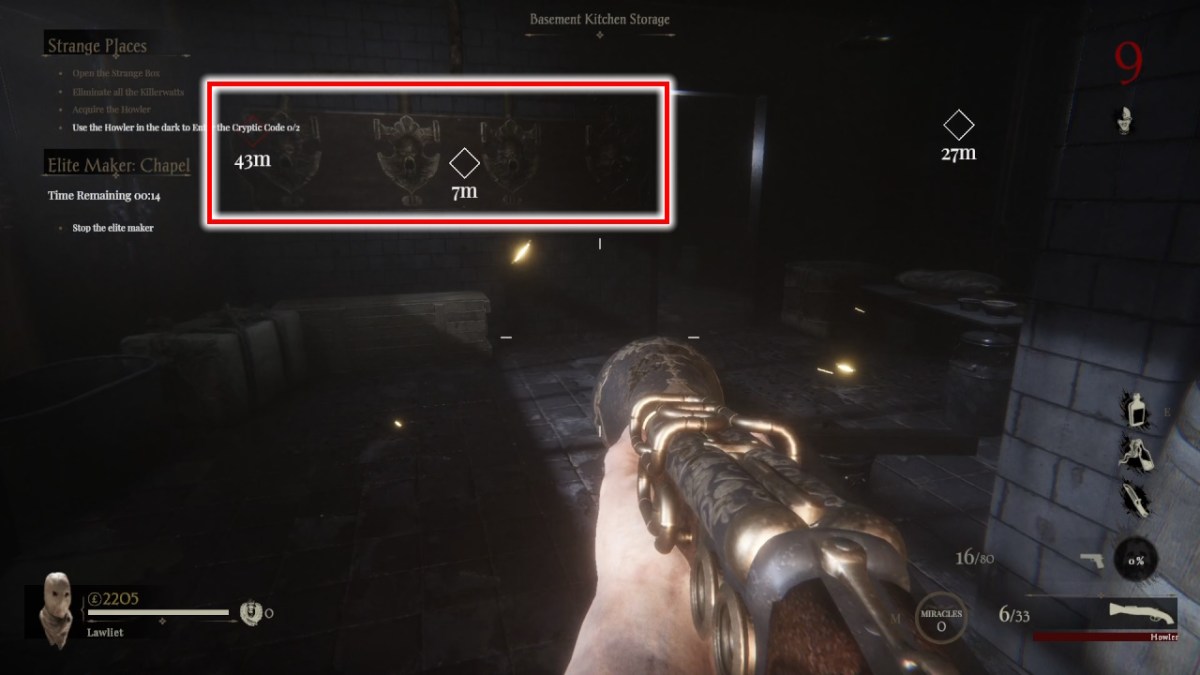
If you attain the navigation marker, you’ll see 4 heads on the wall (pictured above), every with a quantity beneath. It’s a must to shoot the heads with the Howler in a particular order, however you’ll be able to’t see that order till there’s a ‘darkish spherical.’

These rounds are brutal as a ton of Killerwatts spawn, however a code seems on the wall, exhibiting the order. When you’ve shot the heads within the right order, you’ll want to take action once more in one other location. Head again to the Grand Corridor and towards the Floor Flooring Chapel to search out the Floor Flooring Supervisor’s Workplace. I like to recommend memorizing the place this room is, as there’s an accessible ammo machine.
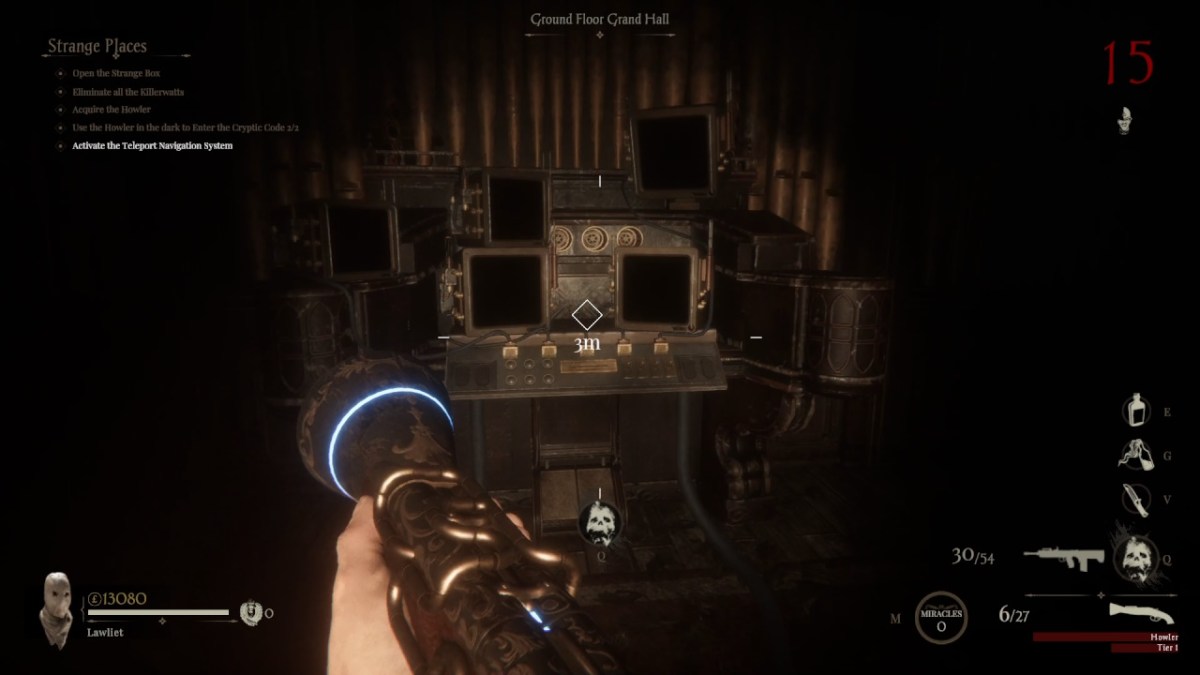
When you’ve entered the codes, head up the steps within the Grand Corridor and work together with the Navigation Machine on the prime.
Retrieve the Punch Playing cards
You need to use the Navigation Machine to choose the teleporter vacation spot. It appears to be like sophisticated, nevertheless it’s less complicated than you assume.
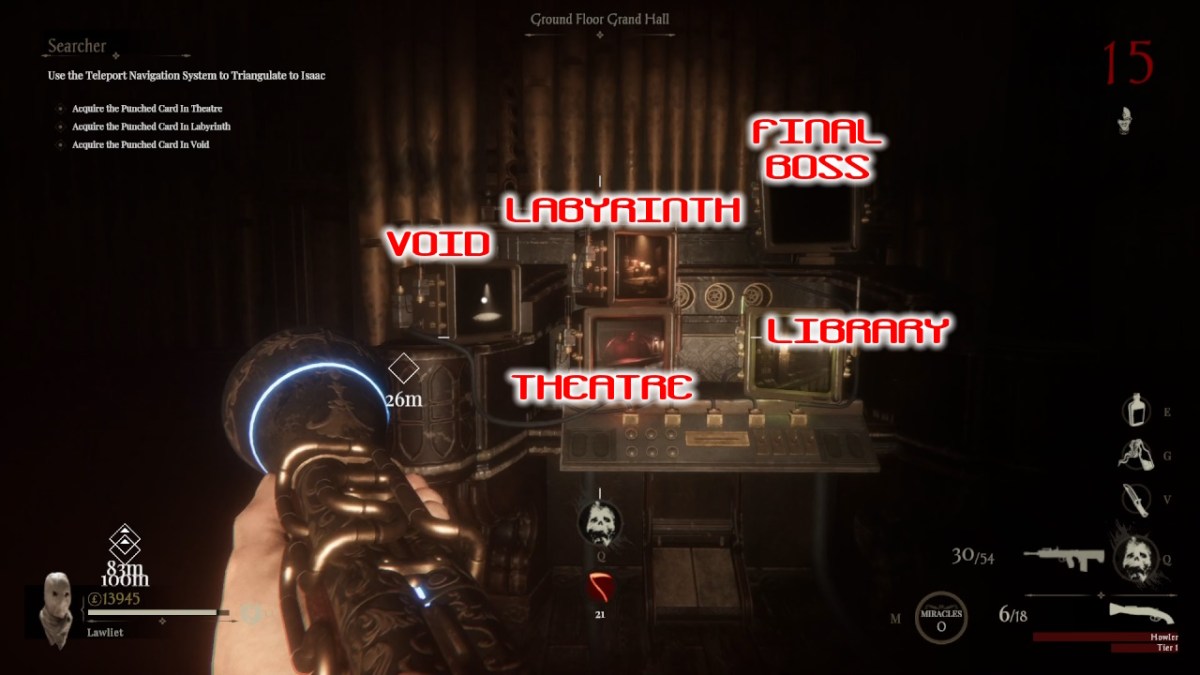
I’ve labeled the place every display will ship you within the image above. You may sort out these aims in any order you want, however right here’s the route I used. After every activity, return to the machine to choose a brand new vacation spot.
Theater
Teleport to the theater and work together with the inexperienced button. After a number of seconds, a creepy animatronic rat will seem on the stage. Your goal is to search out 5 elements to complete constructing it.
Fortuitously, these elements at all times spawn in the identical areas.
The first one is on a seat within the theater room itself. After getting it, teleport again to the Grand Corridor, and also you’ll discover one other subsequent to one of many canister receptacles.
You may swap the teleporter vacation spot to The Library for straightforward entry to the subsequent half. Enter the teleporter, and it’s proper in entrance of you.
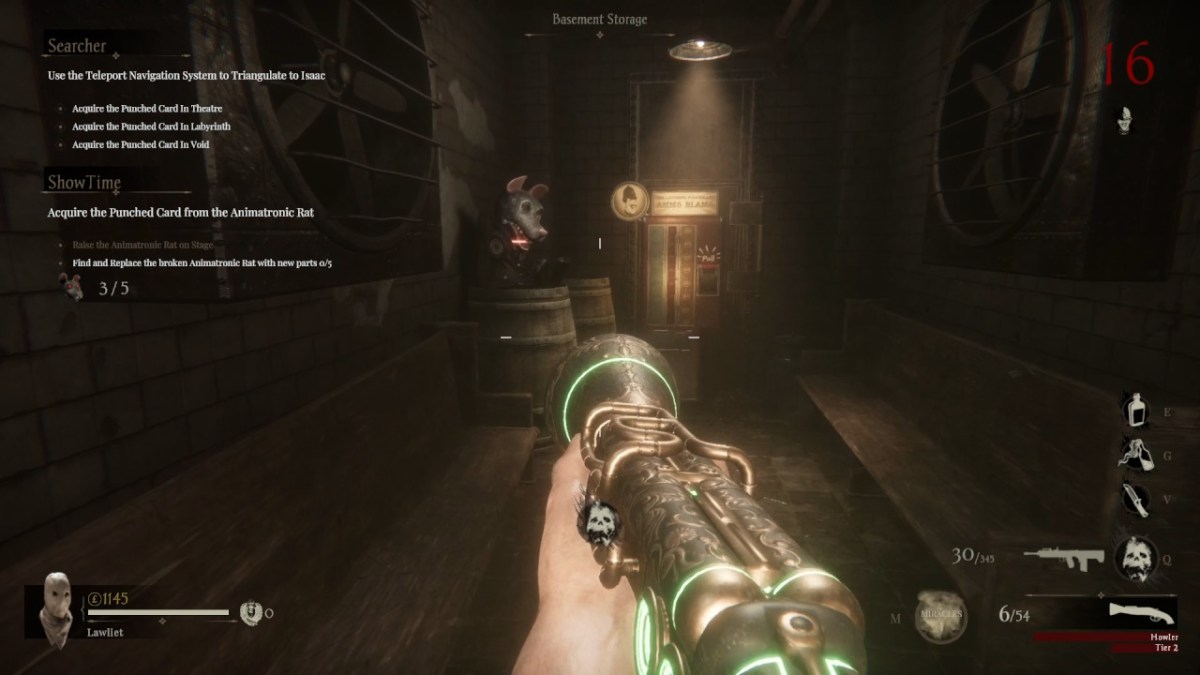
For the penultimate half, return to the principle room and downstairs to the Basement Furnace. Stroll previous the Tremendous Charger and across the nook, and also you’ll discover the merchandise close to one other ammo machine.

The ultimate piece is by the primary Cryptic Code you solved within the basement (pictured above).
After getting all 5 animatronic elements, return to the theater and end constructing the rat. Now, all you might want to do is energy up your furry pal.

When you’re on this step of the mission, Killerwatts will drop batteries when killed (pictured above). You want 10 to energy the rat.
The difficulty is that this may take a number of rounds. I took three rounds to do that half and stayed in the principle room to take action. The principle room is nice, as you’ll be able to disguise behind the steps and use the ammo machine within the Supervisor’s Workplace.
When you’ve 10 batteries, return to the rat and hand them over. Frustratingly, you will need to ship the batteries separately, so you might wish to do it between rounds.
You may acquire your first punched card when you’ve powered up the rat.
The Void
This place is horrifically darkish except you flip your brightness up. Fortuitously, the target is easy. Kill enemies when you’re standing contained in the circle.

The circle slowly strikes across the room, and there’s an ammo machine within the center when you want it. To fill the bar, you want a minimum of 100 kills, which can take a number of rounds. When you’ve hit the quota, seize the punched card from the desk and return via the teleporter.
The Labyrinth
I gained’t sugarcoat it. The Labyrinth sucks! This space is a maze, and whereas it’s not significantly huge, it’s nearly unattainable to navigate as all of the corridors look the identical.

First, work together with the machine by the teleporter with the inexperienced mild on the controls. This can be a cloning machine, and it spawns a cute little lamb. The lamb will slowly comply with you however can get misplaced when you run round.
Your purpose is to information the lamb to a different similar cloning machine. There’s one within the maze in the same room with a inexperienced mild. As soon as you discover it, let the lamb utterly cease earlier than urgent the button.
Your lamb now turns into a pair of lambs, and you will need to discover one other cloning machine with a inexperienced mild. Repeat the method, and your two lambs will develop into 4.
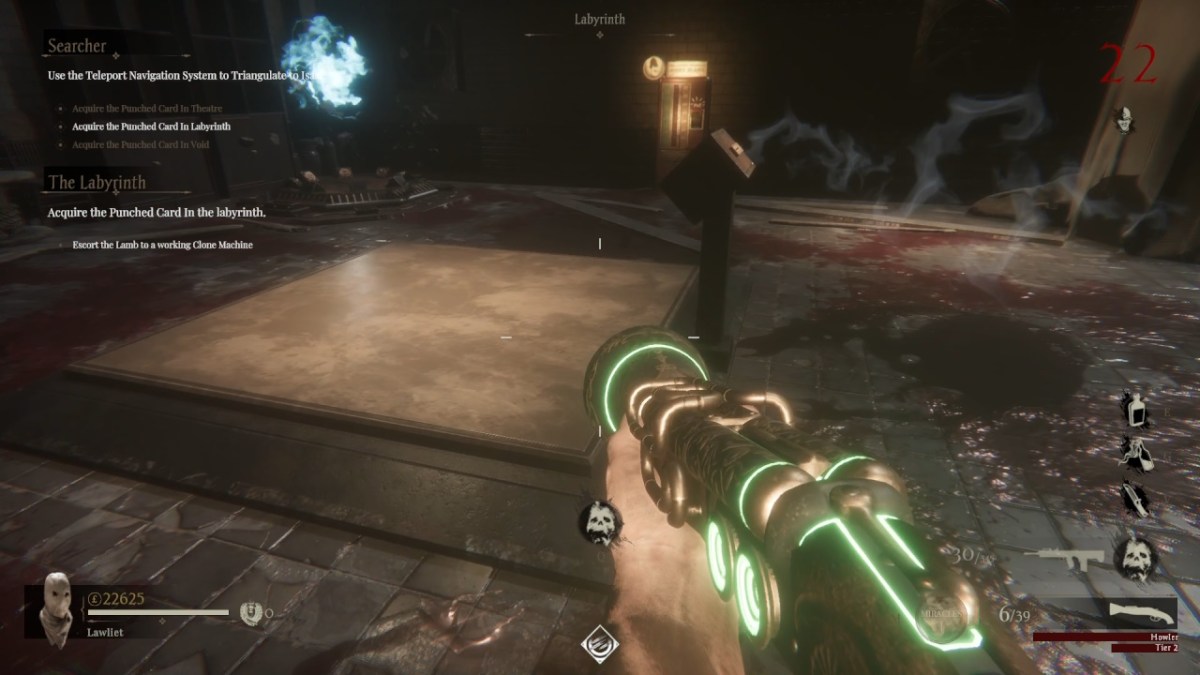
Now you’re a grasp of this shepherding enterprise; you’re on the lookout for the room pictured above. I misplaced three of my lambs on the way in which right here, and it took ages to search out them once more, so take this step as slowly as you’ll be able to. Enemies can’t harm the lambs, however the state of affairs can crumble when you get overwhelmed.
As soon as all 4 lambs have stopped on the sq. platform, work together with the management panel and seize the punched card.
With all three playing cards in hand, work together with the navigation machine. It’s a must to defend the machine by standing close to it, and this step takes fairly some time. You’re particularly uncovered on the prime of the steps, so be happy to maneuver round if wanted.
As soon as the bar is full, you’ll be able to use the display to the top-right to problem the boss.
Defeat Isaac
Isaac is a formidable opponent, however you have to be effective when you’ve been upgrading your Howler. The larger situation is how overwhelming the world can develop into, as there are tons of enemies and environmental hazards. This boss is a slouch on decrease difficulties the place you’ll be able to rapidly burn him down.
Maintain your distance and keep away from taking careless harm, and also you’ll emerge victorious. As soon as Isaac is defeated, you’ll be able to finish the mission or preserve going and see how lengthy you’ll be able to survive.
The format of this stage is extra intricate than the primary, however it’s far more manageable when you already know the format.

